The Problem of Interpreting Lead
Churchill called it forward allowance, the rest of the world calls it lead, call it what you will, every shot taken at anything but a stationary target requires the shooter to put some space (the lead) between his bead and the target. Until some genius comes up with a shotgun cartridge that is as fast as the speed of light we are going to have to deal with the sobering fact that lead shot takes time to travel from the muzzle to the target. That time is proportional to distance but it usually takes about 0.12 seconds for a cloud of shot to travel 40 yards. In that same time a clay target moving 50 mph across the shooter will travel nearly 3 feet. It is intuitive that the shooter would then have to aim 3 feet in front of the clay to hit it.
There are many ways of creating lead, one of the most popular being a maintained lead, which is where the shooter catches up to the bird, overtakes it on its flight plane, establishes the correct distance in front of the bird, and lets fly, not stopping the gun. The second is a more instinctive form where the shooter catches up to the bird with his muzzle, accelerates his swing-through-the-bird, and pulls the trigger at the correct moment. Whichever way it is done, the essential element of the process is to let the shot fly in a direction towards where the shot cloud will meet the target in a point in space.
The next little problem is that shotguns don’t have sights in the conventional sense – usually the sighting system comprises a bead at the muzzle, perhaps a rib running down the length of the barrels, maybe another alignment bead halfway down the barrel. But in all cases there is no backsight. That is because the backsight is your eye. I don’t want to get into left and right eye domination in this article because it is a very vexing and complex issue. So for discussion purposes we will assume that your dominant eye is the one that is looking straight down the barrels of the shotgun, the one you use to (not) aim at the clay.
At this point the reader will ask “What about fit?” and a very valid question it is, because during the act of shooting we should not be conscious of the gun, only the target, and the bead. The eye and bead alignment has to be just right, so that every time the gun is mounted, the eye and the bead of the gun are aligned along the barrel. This can only be accomplished properly by the horrendously expensive process of fitting the gun to the shooter. For those who can afford it, it is well worth it, but for most of us, we just adapt to the gun we have bought. Having said that, many of the top guns fit 90% percent of shooters just fine, so adapting to a gun is a relatively painless process.
Lastly, there is the problem of interpreting lead. It is very difficult for one shooter to tell another what he sees the instant he pulls the trigger on a bird. He might say “Put 2 feet in front of it and slightly below” having successfully broken a target, but there is so much information missing from such a statement that it is barely helpful. Additional useful information might include “I’m seeing a lot of rib”, or “I used maintained lead”, but you rarely hear that.
Most of us have seen the videos on You Tube where an expert has attached a Go Pro camera to his shotgun looking down the rib attempting to replicate the view you would have while addressing, creating lead and shooting the clay. In all of them the camera sits too high, or off line from the rib, for the simple reason that any other way would block the shooter’s eye from seeing the correct sight picture. The result looks awkward and the resolution is poor.
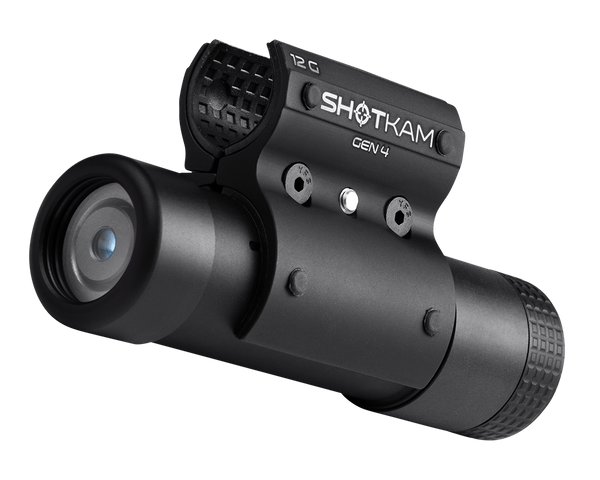
This is where the ShotKam comes in. The ShotKam was developed by a Scottish engineer David Stewart who is an expert in weapons sighting systems. His idea stemmed from a teaching session on the range where his son was struggling to connect with the clay targets. He felt that a video representation of what a clay pigeon shooter tries to achieve would be useful because youngsters have great learning capabilities when using video games.
The next engineering problem was how to create a video camera that could withstand the recoil forces generated by a shotgun. Dipping into his military weapons experience, David created a solid-state video camera and point-of-aim system that was attached below the barrels and could withstand the 1,000G forces that each shot delivers. A working prototype was created in late 2011 and after 6 months of rigorous testing in the Florida marshes, the ShotKam went into production in May 2012. Continual product improvement has resulted in a state-of-the-art camera system that faithfully records your clay pigeon exploits.
After it has been activated, ShotKam’s HD video continuously records and buffers a video picture, but uses a sensitive digital accelerometer which senses when the shotgun is closed and when it is fired. It then writes the AVI video to a 32GB memory card comprising the two seconds before the shot is taken, the actual shot and one second afterwards. The settings are adjustable via the software that accompanies the camera, so you can change the settings for different situations, such as when bird hunting.
The ShotKam comes loaded with a couple of useful features (and one that is totally useless – the laser). The video picture has a reticle superimposed on it – this can be a cross, a dot or a “rib”. It has to be aligned with the shotgun’s actual aiming point to give the user the correct picture. Alignment is a very simple procedure. This is the central feature of the system; it shows exactly where the bead was pointing when the shot was taken.
The system is virtually fire-and-forget. You switch it on at the start of a round, and then forget it is there. The camera goes to sleep while you are waiting your turn, it “wakes up” when you close your gun after you have loaded it, and writes the video to the card when you have fired your shot, or shots in the case of a double. Then it goes back to sleep. You concentrate on your round of clays.
The internal battery can be re-charged via a USB cable and will last for a day’s clay shooting. The battery is not accessible and can only be replaced by the factory. Battery life is estimated to be 3 years. The package comes with both a USB mains and 12V cigarette charger. The data card has sufficient capacity to hold videos for 1,000 clay targets.
The ShotKam is very light, weighing only 150g. It is probably best to mount the camera as far back as you can so that the rhythm of your swing is not affected. Most shooters will not even notice it after a while.
Lastly the ShotKam features a Wi-Fi mode, in that the camera can stream live footage to an Android or Apple device that carries the ShotKam app. Battery life is considerably shortened but an instructor standing next to you can see what you are seeing as you address and shoot the target. So if you have a problem with a particular bird, the instructor can quickly analyze what you are doing wrong and give advice to get you on to that target.
The least useful feature is the laser mode. ShotKam has a built is red laser which can be switched on and projects a bright dot onto a wall, and which allows you to analyze the movement of your muzzles indoors – it is purely a training tool. The problem is that there is no way you can align it with your rib. The example I have projects a good three inches left and two inches low of my aiming point and is thoroughly off-putting. Not to mention that one might pick up the bad habit of unconsciously adjusting your head position to make the red dot align with the bead, with the result that the gun is not pointing where you are looking. I tried it once and immediately switched it off.
When you receive the ShotKam you get a very handy foam compartment plastic carry box which contains the ShotKam complete with lens cap, lens cleaning pen, data card, data card SD converter, a USB cable, a mains charger, 12V cigarette lighter charger, a mounting bracket with rubber pad, and a bag of spares (spare lens cap, screws, rubber pad and Allen keys).
Installing the ShotKam is easily accomplished and is fully illustrated in the instructions and in the video tutorials on their website. You might want to play around with the positioning of the camera on the bottom barrel to minimize the effect on your swing.
Aligning the ShotKam with the rib is also easily done but you will need a smart phone (Either Android or Apple iOS) to do it. The ShotKamPro app must be downloaded from the App store and installed. Turn on the ShotKam Wi-Fi feature and connect with it on your phone – a slightly delayed video picture from the camera appears on the phone. Looking down the rib using your usual sight picture, align the bead of your shotgun with a spot on the wall (a bright orange sticker is provided for just this purpose) with the gun mounted in a cradle and using the direction arrows on the screen move the reticle to align with the spot. Don’t be too hasty, the delay in picture transmission may cause you to overshoot, so make an adjustment, watch the delayed result then move again, if you have to. If you are happy, your ShotKam is now aligned and the camera is now centered on your sight picture.
- Peter Millan, South Africa - ShotKam Customer Review
For more great ShotKam tips, visit Gil Ash's OSP Shooting School site at https://ospschool.com/


